Paracentesis
Technique
Positioning
- Patients with large quantity ascites: supine position with head of bed elevated to 30o to 45o
- Patients with lesser amounts of fluid: lateral decubitus position
Some clinicians prefer to routinely use the lateral decubitus position as the bowel tends to float upward and away from the path of the needle, thus minimizing risk of puncture.
Site of Entry Selection
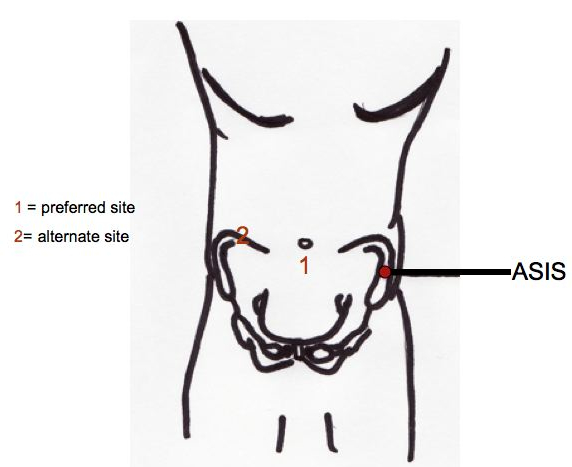
- Preferred site is approximately 2cm below the umbilicus in the midline, where the fascia of the rectus abdominis join to form the fibrous, thin, avascular linea alba
- Take care to avoid large collateral or superficial veins occasionally present in this area
- If the patient has midline scarring, an alternate site should be selected. The preferred alternate site is either right or left lower quadrant, approximately 4-5 cm cephalad and medial to the anterior superior iliac spine. If the patient is in the lateral decubitus position, needle entry will be on the dependent side
- Remain lateral to the rectus sheath to avoid the inferior epigastric artery

- The operator should comply with guidelines for body fluid precautions
- Obtain the paratentesis kit which will contain all necessary materials except those required for anesthesia
- Prep the skin in a sterile fashion
- Drape the patient leaving the puncture site exposed
Procedure
- Administer local anesthesia after the skin has been prepped in a sterile fashion
- Select the needle:
- If performing a diagnostic tap, a 22-gauge, 1.5 inch needle should be attached to a 20- to 50-mL syringe. If the patient has an excessively thick panniculus, a 3.5 inch needle of equal gauge may be used
- If performing a therapeutic tap, a 15-gauge, 3.25 inch Caldwell needle/cannula should be used. A steel needle can be left in the abdomen during a therapeutic tap for intervals of an hour or more without injury
- Insert the needle directly perpendicular at the selected site
- Most operants use the "Z-tract" method, wherein the skin is pulled approximately 2cm caudad in relationship to the deep abdominal wall by the non-needle bearing hand while the paracentesis needle is being slowly advanced while aspirating gently. The skin is not released until the needle has penetrated the peritoneum and fluid flows. When the needle is removed following the procedure, the skin will slide to its original position and help seal the tract, thus decreasing persistent leakage of ascitic fluid.
- Advance the needle slowly in 5mm increments. This allows the operator to detect undesired entry of a vessel and avoid puncture of small bowel
- Avoid continuous suction
- Once fluid is freely flowing, stabilize the needle to ensure a steady flow
- If using the needle/cannula, it should be removed, leaving the outer cannula in place
- For a diagnostic sample, the appropriate amount should be aspirated into the large syringe
- For a therapeutic tap, an evacuation container should be connected using high-pressure connection tubing
- After collecting sufficient fluid, the apparatus should be rapidly removed allowing the skin to resume its natural position
- Ascitic fluid (10mL) should be immediately innoculated into 1 aerobic and 1anearobic blood culture bottle at the bedside
- Depending on the purpose of the paracentesis, the remainder of the ascitic fluid can be sent to the laboratory for cell count, Gram stain, pH, and albumin
- Serum samples needed to calculate serum-ascitic fluid gradients should be drawn within 30 minutes of the paracentesis
- An adhesive bandage should be placed over the insertion site